I love steak! Hopefully I don't offend anyone by admiting that I also love ketchup on my steak (I know, it's a cullinary sin)- even great steaks need ketchup as far as I'm concerned. Well, I used this marinade with no ketchup, so you know it is amazing and soooo flavorful! At our house, we love garlic and balsamic vinegar, so honestly, I usually add more that I'm listing here, but it may be too overpowering for some of you out there.
Steak Marinade:
1 Tablespoon Olive Oil
1 1/2 Tablespoon Balsamic Vinegar
2 Cloves of Garlic, minced or crushed
1 Tablespoon Worcestershire Sauce
1 Teaspoon Soy Sauce
1 Teaspoon prepared Mustard
salt and pepper to taste
Throw all your ingredients in a big freezer bag (they seal better so there's less chance of leakage), mix them around until they're combined then add your steak- any cut will do, this great flavor is wonderful for using cheaper steaks that may be tougher or less flavorful naturally, but feel free to use any steak you find in your grocery cart or freezer. Seal the bag and let it marinade in the fridge for at least 6 hours, but overnight is best. When the grill is ready, pull the steaks out of the bag and throw them on the heat. Mmmmmmmmmm, good!
Saturday, June 27, 2009
Friday, June 26, 2009
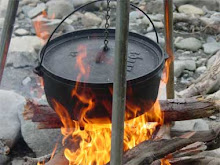
Dutch Oven Days!
During the summer, I struggle to muster much motivation to turn on the stove, heat up the kitchen and cook something; a few years ago, I discovered Dutch Oven cooking and have LOVED IT! I can't think of a Dutch Oven dish that I have not liked, however, this one is my absolute favorite of all time. My uncle is famous for this dish, so, in fairness, I cannot take the credit :) It tastes amazing, but, even better, it is fairly easy to make. My aunt and uncle have been bringing this to family get togethers for as long as I can remember. Thanks Brian and Vikki for sharing this one!!
Brian's Baked Beans:
1 lb Bacon, cubed
1 medium Onion, chopped
5 cans Pork and Beans
2 1/2 Cups Brown Sugar
The simplest way to get your coals started is in a chimney starter, but if you don't have one, any charcoal grill or fire pit will work just fine. You'll want to heat the coals for about 30 minutes before you begin (you could even prepare this over a burner if you want, but it's not as "authentic") I usually buy bulk bacon, the kind that's not even sliced yet, then I can cube it instead of cutting the strips, but, if you buy regular old sliced bacon it works as well. What you're going for is bite sized pieces of bacon. Grab a 12 inch Dutch Oven, heat it over hot coals and cook your bacon bites for a few minutes, you don't want the bacon crispy, just the fat cooked through. Add your chopped onion and saute until the onions are limp. Then, add your pork and beans, any brand will work, and the brown sugar. At this point, all you need to do is heat it through and serve. This is soooo good, I crave it during the summer!
Sweet Treat in the Dutch Oven
Desserts are amazing and easy to do in a Dutch Oven. They are perfect for summer afternoons. One of my favorites is the Pineapple Upside Down Cake, he is my favorite recipe:
Pineapple Upside Down Cake for the Dutch Oven:
1/2 cup Butter
1 1/2 Cups Dark Brown Sugar
1 20 oz can Pineapple Rings
10 Maraschino Cherries
1 Pineapple Cake Mix
1 1/3 Cups Pineapple Juice
1/3 Cup Oil
3 Eggs
The 12" Dutch Oven is the standard size, so usually, if its not specified, I typically assume the recipe will work in a 12"- this recipe is made for that standard size. So, get your coals going, about 30 minutes before you plan to cook. In your 12 inch Dutch Oven, melt the butter, then pull the Dutch Oven off the heat. Sprinkle the sugar evenly across the bottom and arrange the pineapple rings in a single layer in the bottom and sides. Drop a cherry in the middle of each ring and set it aside.
In a mizing bowl, combine your cake mix (yellow can be substituted for pineapple in a pinch), pineapple juice (use the juice from the can of rings, then add water or pineapple concentrate mixed with water to get your 1 1/3 cup), oil and eggs. Mix until just combined, it will still be lumpy but that's the way you want it. Pour the cake batter over the pineapple rings in your Dutch Oven. Put on the lid and arrange your hot coals evenly spaced below the Dutch Oven and on the lid for optimal cooking. About every 15 minutes, turn the Dutch Oven and the lid each a quarter of a turn so the heat is evenly distributed. All together, the cake takes 30-45 minutes (2-3 quarter turns) to cook all the way through. Remove the coals and take off the lid, then inverte the cake on to a serving platter or plate- it is really quite fun looking and the kids love the rings and cherries!
Thursday, June 18, 2009
The Deepest Dish Pizza
In anticipation of father's day, here is one of my husband's favorite recipes- besides, what dad doesn't love pizza? We use a 9X13 inch cake pan because its so deep, and we eat it with a knife and fork but, it is absolutley to die for! You can adjust the toppings to fit your taste, these just happen to be Mike's favorites.
The Deepest Dish Pizza:
Crust
1 1/2 Tablespoons Olive Oil
1 Cup warm milk
1 packet active dry yeast
1 Tablespoon Sugar
2 3/4 Cups Flour
1 ounce Parmesan Cheese
1 teaspoon salt
Preheat the oven to 350 degrees. Use olive oil to greas a 9X13 cake pan and set aside. I use a 2 cup glass measuring cup, but you can use a mixing bowl if you prefer; in this vessle, heat milk, if it's too hot it will kill the yeast, if its not warm enough then the yeast will not activate, you want it about the temperature of your baby's bath (I know, that's probably an inappropriate referance, but its the way I determine temperature). Add the yeast and the sugar to your milk. Mix it up until it is all dissolved, then set it aside for a few minutes to let it proof for 2-5 minutes. In a separate mixing bowl, combine flour, cheese and salt and mix to combine. Add milk mixture to dry ingredinets and mix until a dough forms. Knead for about 5 minutes then cover and let it raise in a warm place for about 5 to 10 minutes. Press dough into oiled cake pan- make sure there is dough in the bottom but also up the sides as well. Pre-cook in to oven for 7 minutes then pull it out and set the dough aside. The dough will not be all the way cooked, we just need to get it started before we cover it with loads of toppings! While dough is cooking, get started on your filling...
Filling
2 Tablespoons Olive Oil
1 lb Italian Sausage
1 clove Garlic
1 small Onion
1/2 lb Mushrooms
4 oz Pepperoni
1 can Black Olives
14-16 oz Marinara Sauce
1 lb mozarella cheese
4 oz Parmesan Cheese
This pizza is much too thick for the toppings to cook on their own while the pizza is in the oven, so, to help things along: in a large skillet, heat olive oil over medium heat. Begin browning crumbled sausage- when its about half way done (about 5-7 minutes), add chopped onions and garlic to saute for about 3-5 more minutes. Continue cooking over medium heat and add peperoni and mushrooms- they can be sliced, but I prefer quartered, I can taste them more that way. Cook toppings until vegetables are softer and peperoni is starting to get crisp. Remove from heat and prepare to top pizza.
In the precooked dough, begin layering with sauce on the bottom, then a few scoops of toppings then mozzarella and parmesan on top; I usually layer 2 or 3 times, but make sure cheese ends up on top. When you've used up all your toppings, sauce and cheese, cover the pizza with aluminum foil and bake at 350 for 15 minutes. Remove the foil at this point and continue cooking for about 10 more minutes.
Once you've had this pizza, you'll never go back to delivery! Happy Father's Day!
Wednesday, June 17, 2009
Creamy Chicken

I discovered this recipe a few months ago and since then, it has been a staple in our menu- we eat this at least once a week. It is super simple and even my picky boys like it.
Creamy Chicken:
1 1/2 to 2 lbs boneless, skinless chicken breast
1/2 Cup butter
1/2 Cup butter
1 teaspoon Kosher Salt
2 teaspoons garlic powder
1 1/2 teaspoon onion powder
1 1/2 teaspoons chili powder
1 Cup heavy cream
In a large skillet, melt 1/4 cup of butter on medium high heat. Place chicken in melted butter and sprinkle with spices. Brown chicken- the spices make a nice thin crust and permeate the entire dish. Add the cream and remaining butter. Simmer, stirring frequently, until cream thickens, it usually takes 5 to 10 minutes. Serve with noodles or mashed potatoes. The chicken has a wonderulf flavor and the sauce makes a delicious gravy for the pasta or potatoes.
If you prefer things with a little kick, like we do at our house, add a teaspoon or so of cayanne pepper to the chicken while cooking.
Tuesday, June 16, 2009
Secret Taco Sauce
This is kind of a continuation of my previous post. This is our absolute favorite taco sauce, however, it would be shameful to limit this amazing condiment to just tacos- it is also amazing on sandwiches, eggs, chicken, etc... It is quite different from sauce I have had on tacos before, but, add it to your favorite tacos and you'll be amazed at the punch of flavor and excitement.
Mix together:
1/4 Cup Buttermilk
2 Tablespoons Mayonaise
1 1/2 Tablespoon Lemon Juice
Whisk them together until it becomes smooth and drizzle over your favorite dish. Now, this is a thin sauce, so I have been know to add any number of taste-free thickeners- but don't use the kind that require heating or cooking, it will not yeild a good result.
The best tacos you will ever eat consist of Secret Taco Sauce, grilled white fish- I usually use cod since it is almost always on hand in my freezer- shredded cabbage, cheese, corn tortillas, a drizzle of lime juice and salsa made from chopped roma tomatoes, onion and fresh cilantro.
It took me quite a long time to work up the nerve to try fish tacos as mentioned above; even though fish is a traditional filling for tacos, it just sounded strange to me. Since discovering the above mentioned fish tacos, they are now my favorite kind, however, if any of you have the same queasy, uneasiness about fish tacos I had, never fear, I am going to tell you a tasty alternative:
Secret Taco Sauce
Grilled chicken-I grill it simply with seasoning salt and garlic then cut it into strips or chunks
shredded lettuce
lime juice
cheese
salsa made from roma tomaotes, onion and fresh cilantro
Wrap it all in a corn tortilla and it's a pretty nice meal!
This sauce is a new staple at our house, I now keep a squeeze bottle ful in the fridge at all times.
Friday, June 12, 2009
Tasty Tortillas
Like many families today, we are looking for every way we can to save a little money- our food budget is one of the few areas that has some wiggle room. In my efforts to cut back a little, I have been brainstorming things to do to spend less at the grocery store. I have always heard that home made is usually less expensive than store baught, so, naturally, since I enjoy cooking and the challenge of making things from scratch excites me, scratch cooking is where I started.
My new favorite, easy, money saving, home made from scratch item is corn tortillas. It takes me about 30 minutes to whip up a batch and they taste much better than the store baught kind. My boys love helping roll out the balls and, especially, squishing them into thin tortillas. I am sure these would be even easier if I had a tortilla press- we are considering investing in a good sturdy model- but until that time, we just use a frying pan to press out the rounds. According to my basic calculations, for me to buy tortillas, it costs about $.16 for each tortilla, if I make them, they end up being less than $.04 per tortilla; though we're only talking pennies differance here, my family eats trotillas by the truckload, and every little bit helps!
This is a very basic recipe found all over, but follow it for fool proof, tasty tortillas:
2 Cups Masa Flour
1 to 1 1/2 Cups Water
1 teaspoon Salt
Combine masa, 1 Cup of water and salt (if you don't have a stand mixer, a hand mixer, or even a wooden spoon powered by your hand will work just fine, the stand mixer just makes the process easier). With the beater attachement, mix until all ingredients are incorporated. If the dough is crumbly, add more water a Tablespoon or two at a time until it is a smooth dough; if the dough is sticky, add more masa flour- again, we're going for a smooth dough. Once you have the right consistency, switch out the flat beater for the dough hook attachment and "knead" the dough for 5-10 minutes (if you're not using a stand mixer, then you'll actually get to knead the dough). Roll the dough into a disc or a ball and wrap tightly in plastic wrap. Let it rest for 30 minutes, for the masa flour to really absorb the water and become the proper texture. Once the dough has sat for 30 minutes, heat a skillet to 400 degrees. Remove dough from the plastic wrap and portion it into 16 sections then roll each piece into a ball- they should be roughly the size of a ping pong ball. If you are struggling to get the seams rolled out of the balls, wet your hands slightly then roll it, seams and lines should disappear easily. It is important to keep the dough moist, if it drys out it will crack and crumble. When not working with the dough, keep loosley wrapped in a damp tea towel. After each ball is complete, use a tortilla press, or a heavy frying pan or skillet, or even a rolling pin or cup, to flatten each ball out to about 5 inches in diameter. I use wax paper or plastic wrap to keep tortillas from sticking while I'm flattening it, then I simply peel one piece off, slap it in the skillet then peel the remaining piece of wrap off the top. Tortillas will need to cook for 15 to 30 seconds per side.
There is a dispute, among experts, about the proper way to cook tortillas- so, to avoid offense to either side, both will be mentioned. Some say, 10 to 15 seconds, flip and cook for 10-15 seconds, then flip back to first side and finish off with an additional 15 seconds. While others argue that all that flipping is not necessary- they reccommend cooking for 30 seconds, flipping and cooking for 15-20 seconds, until tortillas just starts to brown. I have tried both methods and both worked fine for me. Stuff these with your favorite filling- my two favorite ways are scrambled eggs, cheese, sour cream and salsa or grilled fish, cabbage and salsa. These tortillas will keep for a few days in a sealed container in the fridge, and can be reheated either in a warm skillet or the microwave.
To be fair, I must mention that some people prefer to add a little more flavor to their tortillas. I, personally, prefer plain, clean tasting corn and that's it, but, if you'd like to try adding a little garlic, cumin or cilantro to the dough while mixing, it does add an interesting hint of flavor that complements many fillings.
Subscribe to:
Posts (Atom)